
Navigation
In the "Core Components" chapter, we explored how different parts of the app (the image feed and user comments) can be represented as separate screens - components that take up the entire device screen. When building screens, handling how the user navigates between them is a primary concern. Navigation is a major piece of any mobile application with multiple screens. With a navigation system in place, a user can access any part of an application. It also allows us to structure and separate how data is handled in the app.
Handling navigation in a mobile application is fundamentally different from a website. For a website, the state of a user's location is usually kept in the browser's URL. Although the browser maintains a history of pages visited in order to allow the user to move back and forth, the browser only stores page URLs and is otherwise stateless. On mobile, the entire history stack is maintained and can be accessed.
On mobile, we have more control and flexibility over history management. We can keep a history stack that includes details of each route including parameters and part of the application state.
Further, mobile navigation presents its own set of challenges. One of the biggest is the reduced real estate of the user's device screen compared to a desktop or laptop computer. We need to make sure there are easily visible and identifiable navigation components that will allow the user to move to another part of the application when pressed. Including a complex navigation flow comes with the cost of a larger number of navigation components (such as menu options). For this reason, most mobile apps tend to have a small and focused number of screens that a user can easily navigate to and understand.
Navigation in React Native
This section will explore the landscape of navigation in React Native in some detail. If you would like to jump straight to building our sample application, feel free to skip this section and return to it later.
One of the primary navigation patterns in a mobile app is a stack-based pattern. In this pattern, only one screen can be seen by the user at any given time. Navigating involves pushing the new screen onto the navigation stack. We'll explore stack-based navigation in more detail later in the chapter. For now, it is important to realize that this pattern, among others, uses different native components for iOS and Android. For example, building a stack-based navigation flow between screens can be done using UINavigationController for iOS and connecting Activities for Android.
There are two primary approaches to navigation in React. We can either include actual native iOS/Android navigational elements or use JavaScript to create the required animations and components that we need.
Native navigation
The first way we can add navigation is to use native iOS/Android navigational components.
In an iOS application, views are used to build the UI and display content to the user. A view controller (or the UIViewController class) is used to control a set of views and allows us to connect our UI with our application data. By including multiple view controllers in our app, we can build different screens as well as transition between them.
A navigation controller (UINavigationController ) simplifies the process of navigating between screens by allowing us to pass in a stack of UIViewControllers. It will take care of including a header navigation bar at the top of our device with a back button that allows us to pop the current view controller off of the current stack. With this, it maintains the hierarchy of all the screens within the stack.
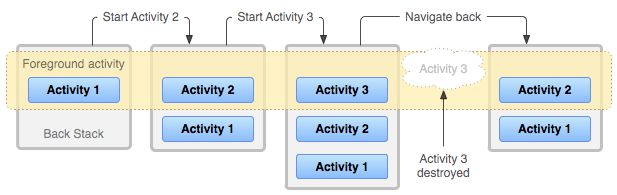
In Android, activities are used to create single screens to define our UI. We can use tasks in order to define a stack of activities known as the back stack. The startActivity method can be used to start a new activity. When this happens, the activity is pushed onto the activity stack. In order to return to the previous screen, the physical back button on every Android device can be pressed in order to run the finish method on the activity. This closes the current activity, pops it off the stack and returns the user back to the previous activity.
In React Native, all of our component code executes on a JavaScript thread. These components then bridge to a separate main thread responsible for rendering native iOS and Android views.
In the first chapter, we briefly mentioned how we can eject from Expo if we need to include any native dependencies ourselves. This includes any native iOS or Android code we wish to write ourselves or third-party libraries that provide a React Native API which bridges to a specific native module. We can use this to include native navigation in our application. We can create native modules around platform-specific navigation components (such as UINavigationController and Activity) and bridge them ourselves in a React Native app.
We'll explore bridging native APIs in much more detail in the "Native Modules" chapter.
Pros
The primary benefit of this approach is a smoother navigation experience for the user. This is because purely native iOS/Android navigation APIs can be used with all of our navigation happening within the native thread. This approach works well when including React Native in an existing native iOS or Android application. Using the same navigation components and transitions throughout the app means that different screens in the app will feel consistent regardless of whether they're written natively or with React Native.
Additionally, if an operating system update modifies the style or functionality of navigation components, you won't have to wait for the same modifications to be made in your JavaScript-based navigation library.
Cons
One of the issues with this navigation approach is that it usually involves more work. This is because we need to ensure navigation works for both iOS and Android, using their respective native navigational components.
Moreover, we will also have to eject from Expo and take care of linking and bridging any native modules ourselves. This means we cannot build an application with native iOS navigation components if we do not own a Mac computer.
Another potential problem with this solution is that it can be significantly harder to modify or create new navigation patterns. In order to customize how navigation is performed, we would have to dive in to the native code and understand how the underlying navigation APIs work before being able to change them.
Navigation with JavaScript
The second approach to adding navigation to a React Native app is to use JavaScript to create components and navigation patterns that look and feel like their native counterparts. This is done solely using React Native built-in components and the Animated API for animations.
We can explain how this works by using stack navigation as an example again. As we mentioned earlier, this pattern allows us to move between screens by pushing a second screen on top of the previous one. We usually see this happen by seeing the second screen slide in from either the right or bottom edge of the device screen or fading in from the bottom. When we attempt to navigate backwards, the current screen slides back out in the opposite direction or fades out from the top.
With the Animated API, we can use animated versions of some built-in components such as View as well as create our own. We can create stack based navigation (as well as other navigation patterns) by nesting our screen components within an Animated component. We can then have our screens slide (or fade) in and out of our device when we need to allow the user to navigate throughout our application. We'll have to maintain the hierarchy of screens entirely in JavaScript ourselves.
Pros
One of the advantages of using JavaScript-based navigation is that it can be simpler to build the components and animation mechanisms that can be used in both platforms instead of trying to create a bridge to all of the core native iOS/Android APIs that we would need. This also gives us more control and flexibility to customize specific navigation features instead of relying on what's available in the native platforms. We can debug any issues we experience with navigation that is purely JavaScript-based without diving in to native code.
Most of the work during an animation using the React Native Animated API is on the JavaScript thread. This means that every frame needs to go over the bridge to the native thread to update the views during a transition. Fortunately, we have the option to use the API's native driver option to render natively driven animations. These animations are performed with animation calculations happening on the native thread. By building navigation with this, navigation animations will perform smoothly.
We'll explore the built-in
AnimatedAPI in greater detail in the next chapter.
Another benefit of keeping all of our navigation elements within the JavaScript thread means that we can take advantage of services such as CodePush to allow us to dynamically update the application's JavaScript code (which includes our navigation) without rolling out a new build to our users.
Cons
There are also disadvantages with this approach. Firstly, the app can never feel exactly like a native application in terms of navigation. As much as we can try to mimic how navigation components and animations look like in the native layer, there may always be slight discrepancies. This can be a bigger problem if we happen to be including React Native components into an existing native iOS or Android application. Building transitions between screens built natively and screens built with React Native can be a challenge if we're using only JavaScript for our navigation.
Another potential concern with JavaScript-based navigation is slower updates in relation to the underlying platform's operating system. Updates to the iOS or Android version may bring changes to the native navigational views and components. We'll need to make sure the views and components built with JavaScript are also updated in order to better match how they are represented natively.
Third-party libraries
In React Native, we have the option of setting up navigation by creating our own native modules or by building our own JavaScript-based implementation. There are also a number of community-supported libraries that we can use for either of these approaches:
- React Native Navigation by Wix engineering and Native Navigation by Airbnb are both navigation libraries that provide access to native iOS/Android navigation components using a React Native API.
- React Navigation and React Router are two popular third-party JavaScript navigation libraries.
Using one of these libraries can make things significantly easier than building a navigation pattern entirely from scratch. Moreover, all of these community-built libraries are continuously maintained with updates included in each new release.
Navigation alternatives
Not all mobile applications need to have a complete navigation architecture. Examples include an app that only has a few screens or does not even need any navigation in the first place (such as a single-screen game). However, most applications with more than a few screens will usually need some form of navigation to allow the user to move between them.
There is no single correct solution for applications that require navigation. Different mobile apps will always have different features and complexities. For example, it may be easier to use a JavaScript implementation in a brand new and relatively simple application without complex navigation requirements. However, we might find it easier to use a native solution if we plan on rolling React Native components into a native application. We should always weigh the benefits and challenges of each solution before deciding which approach to take.
Deprecated solutions
Navigation is a core tenet of any native application. Just like other built-in components (such as
ViewandText), React Native also used to provide a number of different built-in navigation APIs. Here are a few examples:
- NavigatorIOS provides an API to access the
UINavigationControllercomponent for iOS to build a screen navigation stack. It is not currently maintained and cannot be used for Android.Navigatoris a JavaScript navigation implementation that was included into React Native when it first launched. Expo builtExNavigatoron top of this API with the aim of providing more. features. However, it did not provide a complete navigation solution and was deprecated soon after.NavigationExperimentalis another JavaScript implementation and aimed to solve the problems noticed inNavigator.ExNavigationwas built by the Expo team to act as a wrapper aroundNavigationExperimental. It is also now deprecated.It is important to note that all of these APIs are either not maintained or are deprecated. It is recommended to use one of the newer community-built navigation libraries instead.
Since navigation is an important part of many mobile applications, all of these efforts were done in order to provide a simple React Native API that can be imported and used directly in a component. However, navigation is a lot more complex than many other built-in components. It is not easy to provide a simple navigation API that can solve all navigation concerns in any application. For this reason, a number of different open-source alternatives were created by the community. The efforts from
Navigator,NavigationExperimental, and the community-builtex-navigationwere combined to form the community-builtReact Navigationlibrary.
In this chapter
We covered the differences between native and JavaScript navigation implementations as well as some of their advantages and disadvantages. For each approach, we also discussed how using an open-source library that is continuously maintained can make things easier than building a navigation architecture from scratch.
This page is a preview of Fullstack React Native: The Complete Guide to Building Beautiful React Native Apps
Get the rest of this chapter plus hundreds of pages of React instruction, 4 sample projects, a screencast, and more.
