
Building and publishing
After spending some time completing a mobile application, the next natural step is to share your work with the world! If we want any user to be able to access our application at any time, we need to build and publish it to an app store. By doing so, we let users discover and download our application to their device.
How to read this chapter
This chapter serves as a reference for when you need to deploy and distribute a React Native application. Unlike other chapters, you won't be following along with an example application. Feel free to read it now to get an idea of the process and return later when you're ready to publish an application of your own.
Shipping an application to an app store is generally a two-step process:
- Create a native build of our application. This involves generating an IPA (iOS App Store Package) file for iOS and an APK (Android Package Kit) file for Android.
- Publish the build to an app store. App Store Connect and Google Play Console are the two platforms used to publish and distribute an iOS and Android application respectively.
We'll start with Building. There are two different approaches to creating a build. We'll weigh their advantages and disadvantages.
After this section, we suggest you head directly to the section covering the operating system that you plan on publishing with: iOS or Android.
Building
We explored how to add native components to a React Native application in the "Native Modules" chapter. While doing so, we described how to set up the necessary integrated development environments (IDEs) needed for writing native code. To develop for iOS, Xcode is the required IDE and can only be installed on a Mac computer. Android Studio is the official IDE used for Android development.
In order to submit to an App Store, we first need to create a build of our application that we can publish. If we were building mobile applications without React Native, we would use the same IDEs that we write native code with to create builds of our application. With applications built with the Expo CLI, we can create standalone builds in two different ways:
- Using the Expo CLI directly
- Ejecting and creating builds manually through Xcode or Android Studio
Both approaches will allow us to generate iOS and Android builds that we can deploy to app stores. Each approach has its advantages and disadvantages, which we will cover in a little bit.
In the next section, we'll explore how Expo allows us to create standalone builds using one of its tools. After that, we'll review the pros and cons for using this approach as well as the trade-offs for building manually using the IDEs.
Building with Expo
In order to build with the Expo CLI, you need to have an Expo account. You can create one at https://expo.io/signup. Once your account is set up, you can sign in directly through the command line:
expo login
The app.json file is automatically generated in the root directory when creating a new project with Expo and allows us to modify a number of build configurations. Although it populates with many fields by default, only a number of attributes are required for a native build.
{
  "expo": {
    "name": "Weather",
    "slug": "weather",
    "sdkVersion": "33.0.0",
    "icon": "./path/app-icon.png",
    "version": "1.0.0",
    "ios": {
      "bundleIdentifier": "com.companyname.appname"
    },
    "android": {
      "package": "com.companyname.appname"
    }
  }
}
name: The name of the application that shows on the device home screen for applications installed through an App Store.slug: The URL name for published Expo applications. For this configuration, the URL will look likeexpo.io/user_name/weather.sdkVersion: The Expo sdkVersion that the application is running with. This needs to match with the installed version inpackage.json.icon: The icon of the application that shows on the device home screen.version: The version of your current build.ios/android: iOS and Android build-specific configurations. The iOSbundleIdentifierand Androidpackagefields are both unique strings that identify the application and follow a reverse domain naming convention. It is important to make sure a proper name is chosen for both fields, as they cannot be changed once the application is published to an App Store.
Although these are the only fields that are required to create native iOS and Android builds, there are many other configurations that we can add including defining a splash screen, modifying the app status bar and using appropriate and platform specific app icons.
Expo provides an extensive guide for best practices when creating builds to publish to App Stores. Further, Expo provides a full list of possible configurations.
Pros and cons of building with Expo
Creating builds with Expo is only possible if we do not plan on including any custom native code whatsoever. If we need to include any native dependencies in our application, we have to eject and create our builds manually using Xcode and Android Studio. If you have already ejected, then skip right ahead to the "Building Manually" section of this chapter. Otherwise, we highly recommend to use Expo as it is a much simpler and quicker build process.
The Expo platform supplies a CLI to automate the process of creating a native iOS or Android build of our application. When building for both iOS and Android, signing files are required to identify the author of the application. Expo can automatically generate these files for you. This method allows us to create iOS builds without using Xcode and without owning a Mac computer. However, Xcode is still required to publish the build to the iOS App Store.
Another significant advantage of using this approach is over-the-air (OTA) updates. By default, applications published with Expo will always check for updates when launched. If a new version of the app has been published with Expo, the updated build will be fetched and loaded automatically. With this, we can release fixes and updates to our application without going through the process of publishing a new version to the App Store. We'll cover this feature, along with its limitations, in more detail at the end of this chapter.
A drawback of this approach is the limited control it allows over the build process. The final bundled build will include every API provided by Expo, regardless of whether we use them or not. This can result in significantly large build sizes even if the code that makes up our application is relatively small.
Pros and cons of building manually
We can create builds of our application using the IDE for each platform, Xcode and Android Studio. The primary advantage of this approach is the capability to add native iOS and Android code to our application. Building manually also allows us to take full control over the build process, and this includes modifying any signing steps and adjusting the final build size ourselves.
The downside is that in order to use an IDE to build our app, we have to eject from Expo. This means that we will have to own a Mac computer to create an iOS build. And as mentioned in the previous section, the process of creating builds manually is much more complicated than using Expo. We recommend taking this approach only if you need to include native code for your application and own a Mac computer (if you wish to build for iOS).
As we covered in the last chapter, we have two different options for ejecting. We can either eject to a regular React Native project, or detach to ExpoKit. Ejecting to regular React Native means we also lose access to APIs provided by Expo. Further, we no longer benefit from the platform's built-in OTA updates. To push new updates to our users without deploying a new build version, we'd need to use a tool like Microsoft's CodePush. However, ExpoKit allows us to build with the IDEs while retaining access to Expo APIs (and OTA updates).
Reference Guide
Now that we've outlined our options, the rest of this chapter will be a reference guide that you can refer to when you need to build and publish a React Native application. You can skip directly to the operating system that you are currently working with.
iOS
As we mentioned previously, you can skip directly to the appropriate build method depending on the state of your application:
- If you have not ejected your application and do not plan on adding any native dependencies, you can read the next section and skip the section that explains how to use Xcode to create a build.
- If you have an ejected application, skip the following section and head directly to "Creating an iOS build with Xcode."
After using one of the two strategies to create a build, you can head to the "Testing the final build" section to learn how to test your final build before continuing to read how to publish to the App Store.
Creating an iOS build with Expo
In order to create builds for iOS applications, you need to enroll in the Apple Developer Program. You can either enroll as an individual or an organization. As an individual, apps distributed in the App Store are tied to your personal name. As an organization, apps are tied to a legal entity's name.
Once we have a developer account set up, we can build a native iOS bundle through Expo with the following command:
expo build:ios
We are then asked how we would like to handle our credentials:
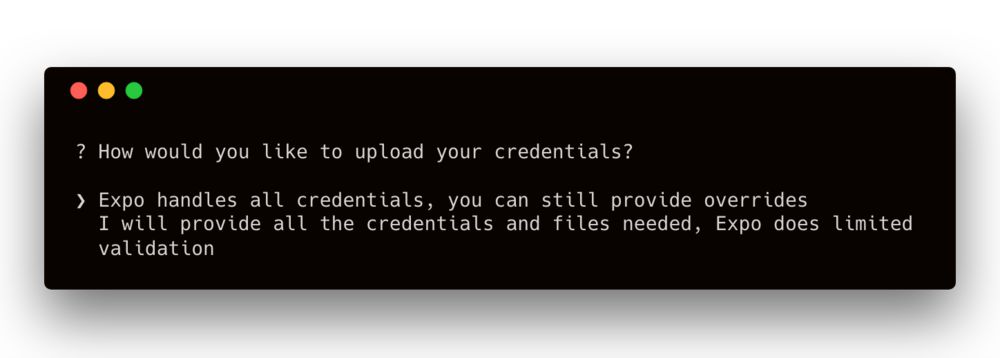
The credentials here refer to signing certificates and a provisioning profile needed to submit applications to the App Store. We'll go with the simpler option of letting Expo handle all of the credentials here, but we will explore what each of these mean in detail in the next section.
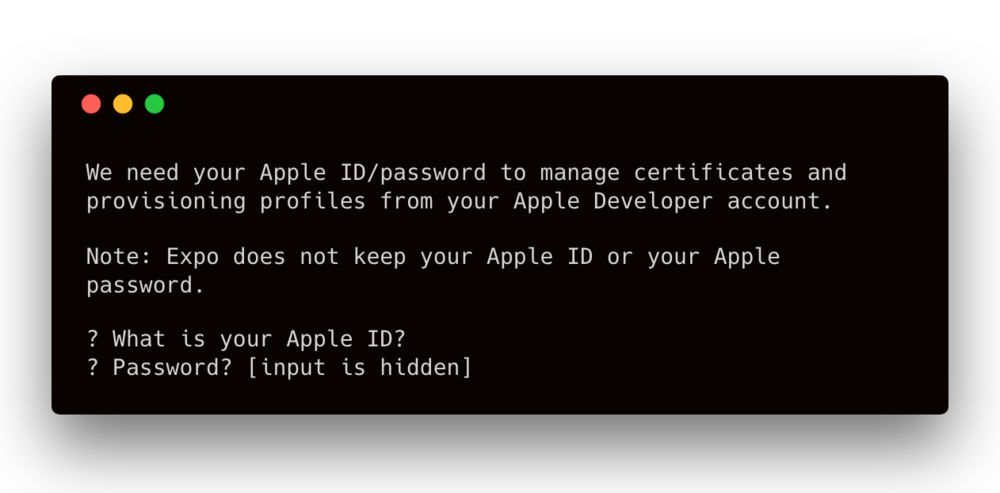
Once we have selected the option for Expo to take care of managing our files, we'll need to submit the ID and password for our Apple Developer Account:
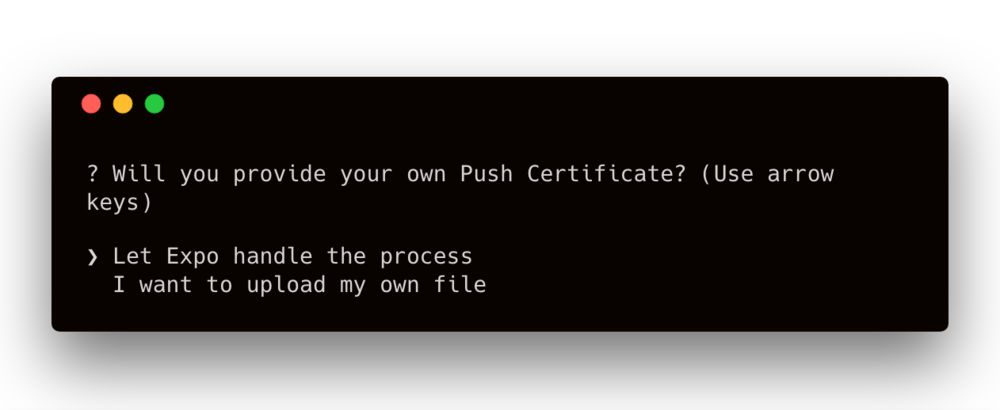
Although we specified we want Expo to handle all credentials, we still have the option to provide overrides for specific certificates. Expo prompts us about these next. We want Expo to handle both:

Next, the build process will begin and a URL is provided
(e.g. https://expo.io/builds/unique-id).
This URL provides access to the current status of the build and you can follow along by reading its logs.
Clearing Credentials
Expo will always check if a certificate and provisioning profile exist before asking whether it should handle creating new files or allow you to provide them. If you wish to clear the already available credentials, you can run
expo build:ios --clear-credentials.
The build process can take a few minutes to complete. Once completed, another URL will be provided that contains the generated .ipa build file. Pasting this link into your browser's address bar will begin downloading it to your machine.
Creating an iOS build with Xcode
As we mentioned earlier in this chapter, an account with the Apple Developer Program is necessary in order to create a build ready for distribution. You'll need to enroll if you haven't already.
Once enrolled, the first thing we'll need to do is code sign our application. Code signing is the process of using a digital signature to identify the application author's identity. Signatures are used to ensure that updates to an application are published by the same author.
With Xcode, we have two options for code signing an application:
- Manually, where we provide all the resources ourselves
- Automatically, where Xcode takes care of creating all the necessary signing credentials
Automatic code signing is recommended in the Xcode documentation as it simplifies the process of creating all the required assets needed for signing. Xcode takes care of creating all the needed credentials and we only have to provide our developer account without doing more additional work. With this approach, Xcode will:
- Create the necessary signing certificates
- Create an App ID
- Handle all the provisioning profiles needed
Manually code signing an application means that we will have to create all the needed assets in the Apple Developer Console and assign them to our application ourselves. This approach gives us some more control over which provisioning profiles and signing certificates we would like to use.
If you don't need to use a particular profile or certificate for your application, you should use the recommended approach of automatic code signing. We'll cover this first. After reading, feel free to skip the portion of this chapter where we cover how to manually code sign your application.
If you are interested in learning more about how provisioning profiles and signing certificates work, or you would like to manually handle these credentials yourself, then you can head directly to "Manual Code Signing".
Xcode version 9.1 is used in this chapter. There may be slight inconsistencies to the UI displayed in the screenshots if you happen to be using a later version of the software. However, the general procedure should remain the same.
Automatic Code Signing
To access a React Native application using Xcode, we can open the /ios/AppName.xcodeproj file in our project. An Xcode project file (.xcodeproj) contains all the source files and resources needed for building and managing a project with the platform.
Once the file is opened with Xcode, you should see your application loaded as the main target. This is what the default dashboard looks like for an open application:

The bundle identifier in the Identity section of the General tab is a required field and is a unique string that identifies your application. Once a build of your application is uploaded for submission, this field cannot be changed. The version and build number fields also need to be completed and will be used by App Store Connect to identify different versions of your application.
This page is a preview of Fullstack React Native: The Complete Guide to Building Beautiful React Native Apps
Get the rest of this chapter plus hundreds of pages of React instruction, 4 sample projects, a screencast, and more.
