


This post is a part of the React Daily UI post series, a joint effort between Jack Oliver, Sophia Shoemaker, and the rest of the team at Fullstack React. Each day we're explaining in detail how to create a UI component with React.
You can view the Codepen implementation here
Or you view the code on Github here
Welcome to React Daily UI, where every day is opportunity to learn how to build beautiful React applications. We're really excited to be partnering with Jack Oliver who is embarking on this ambitious project with us.
Jack is designing and writing the code for these applications and we're going to deconstruct each one to highlight the features that are unique to React.
Today we're going to learn how to use React Router v4 and include a 404 page for our website:
Overview
Today we're going to make a simple website. The website we are going to build deviates slightly from Jack Oliver's original implementation on CodePen so we can highlight some of the features of the latest version of React Router. We are going to learn about version 4 of React Router which is a different approach to how the router works compared to earlier versions. The documentation for React Router v4 is a really great resource and highly recommended for getting started with React Router v4.
Table of Contents

Want to be a pro at building UIs in React?
This post is the first of many that will explain step-by-step how to create professional UI components in React. If you want to become a pro at building UIs in React, put in your email below and we'll notify you as each post is completed.
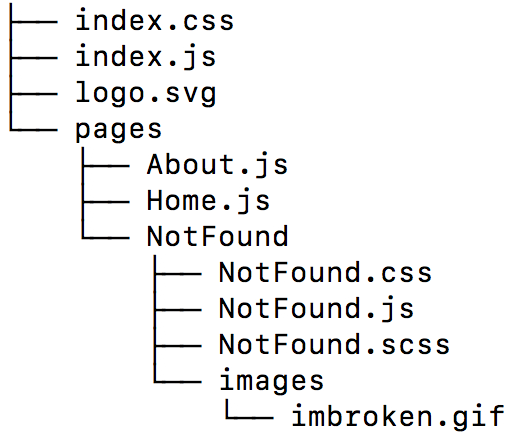
Source code structure
First, we're going to create three pages for our site: the home page, an "about us" page and our "404" page. All of the pages for our website will be in the pages folder (which lives inside the src folder). Each page will have a JavaScript file. If there are any other associated assets with that page, such as a CSS file or images, the JavaScript file and the corresponding assets will all be put in a folder.
Our website has two JavaScript files in our pages folder: Home.js and About.js and a NotFound folder which contains the JavaScript and CSS for the 404 page.
The Home and About components
Our Home and About components are very simple function components that return the title of the page with no other content.
function Home(props) {
    return (
      <div className="page-container">
        <h1 className="title">Hello</h1>
      </div>
    )
}
function About(props) {
    return (
      <div className="page-container">
        <h1 className="title">About</h1>
      </div>
    )
}
The NotFound component
Our NotFound component has some slightly different styling which includes a gif for a background image.
function NotFound(props) {
    return (
      <div className="page-container">
        <div className="bg" style={{ backgroundImage: 'url(' + broken + ')'}}></div>
        <h1 className="title">404</h1>
      </div>
    )
}
Here is the CSS code for it:
.page-container .bg {
  position: absolute;
  top: 0;
  left: 0;
  width: 100vw;
  height: 100vh;
  background-size: cover;
  mix-blend-mode: overlay;
}
Set up React Router
To set up React Router we need to first install the latest version for the web:
npm install react-router-dom
Then we need to import the components we'll need to use React Router in our website.
The components we are going to need are:
BrowserRouterNavLinkRouteSwitchRedirect
We'll import all these components in the top of our index.js file like so:
import {
  BrowserRouter,
  Route,
  NavLink,
  Switch,
  Redirect
} from "react-router-dom";
Now that we've imported all the components we need, let's use them to create our website.
BrowserRouter
If you look at our index.js file, we have wrapped our entire application in a BrowserRouter component. The BrowserRouter component is the "meat & potatoes" of using React Router. The BrowserRouter component inherits from a core Router component and makes it possible to include routing in our React web applications.
NavLink
Inside our BrowserRouter component we have the navigation area of our page which contains links to the various pages of our site. We are going to use the NavLink component for our links. The NavLink component automatically adds the active class to the rendered a element when the current URL matches the to path in our NavLink component.
<ul className="navigation">
  <li><NavLink to="/">Home</NavLink></li>
  <li>
    <NavLink to="/about-us">Old About Us Page (will redirect)</NavLink>
  </li>
  <li><NavLink to="/about">About Us</NavLink></li>
  <li><NavLink to="/not-found">Invalid Page</NavLink></li>
</ul>
Route
Below the navigation section of our page is where all the React Router magic actually happens!
We use two React Router components, Route & Switch to determine which page the user will actually see when they click on a link in our navigation. We wrap Route components inside a Switch component, but before we get to the purpose of the Switch component, let's first understand how to use the Route component because the it is one of the most crucial pieces of using React Router.
In our website we have 3 Route components and each one has a few features that make it different from the others. All of our Route contain props that will determine when and how we want our pages to be displayed. Each Route uses the component prop to specify which component we want rendered.
The first Route renders our Home component and also uses the following props:
path: This prop specifies which path we want to match. In the case of the home page we want theHomecomponent to render when the user browsers to/exact: This prop indicates that we only want to render when the path matches exactly. This is important for the/path. If we did not specifyexact, when the user typed in any URL to browse our website, theHomecomponent would render every time, regardless of the path since every path in our website contains/(/about&/about-us).
<Route path="/" exact component={Home} />
The second Route renders our About page and contains the path prop as well. This Route does not use the exact prop -- any path that contains /about will render the About page
<Route path="/about" component={About} />
Finally, our third Route is our 404 page. This Route component does not contain the path prop, so it will always render.
<Route component={NotFound} />
Redirect
Within our Switch component we also have one more type of component, a Redirect component. This component allows us to set up redirects. For our website, we want to make sure that if the user browsers to /about-us we redirect them to the correct URL, /about, so we'll add this Redirect component to make sure that happens.
<Redirect from="/about-us" to="/about" />
Switch
All of our Route components and our Redirect component are contained within a Switch component. By default, a Route will render a component if the all the requirements for a Route are met. For example, if we did not wrap our three Route components in a Switch component, and the user browsed to the /about URL, the About component and our 404 component would both render on the page. Wrapping our Route components in a Switch tells our router that we only want to render the first "match" it finds. So placing our "404" Route as the last route ensures that if there are no matches, the 404 page will be displayed (and only the 404 page).
<Switch>
  <Route path="/" exact component={Home} />
  <Redirect from="/about-us" to="/about" />
  <Route path="/about" component={About} />
  <Route component={NotFound} />
</Switch>
Try it out!
Check out the Codepen example:
The complete source for this article is also available on Github here.
To start the app, download the code,
cdinto the project directory and type:npm install npm start
Want to be a pro at building UIs in React?
This post is the first of many that will explain step-by-step how to create professional UI components in React. If you want to become a pro at building UIs in React, put in your email below and we'll notify you as each post is completed.

Learn React the right way
The up-to-date, in-depth, complete guide to React and friends.
Download the first chapter