


This post is a part of the React Daily UI post series, a joint effort between Jack Oliver, Sophia Shoemaker, and the rest of the team at Fullstack React. Each day we're explaining in detail how to create a UI component with React.
You can view the Codepen implementation here
Or you view the code on Github here
Welcome to React Daily UI, where we are going 100 days building 100 beautiful React applications. We're really excited to be partnering with Jack Oliver who is embarking on this ambitious project with us.
Jack is designing and writing the code for these applications as we are deconstructing each one to highlight the features that are unique to React.
Today we're going to create an updating app icon:
Overview
Our app icon displays the user's location and weather. The icon's background also animates based on the time of day. We'll use the JavaScript fetch method and two different third party APIs to retrieve the user's location and weather. We'll also make use of CSS transistions to apply our animation on the background.
Table of Contents

Want to be a pro at building UIs in React?
This post is the first of many that will explain step-by-step how to create professional UI components in React. If you want to become a pro at building UIs in React, put in your email below and we'll notify you as each post is completed.
The JavaScript fetch API
For our app icon, we'll request data from two different APIs. We get the user's location based on their IP address using http://freegeoip.net/. Once we have that, we'll get the weather for that location using the API from http://openweathermap.org/.
Instead of using the native XMLHttpRequest object or using JQuery's $.ajax method (which is a wrapper for XMLHttpRequest) we'll use the new global fetch method. The fetch method is a cleaner and simpler interface for making AJAX requests and makes use of Promises.
What is a Promise?
A Promise in JavaScript is an object that represents a value that is either available now, in the future, or possibly never.
When a Promise instance is created, the actual value of the of the Promise is not necessarily known. Instead of receiving the value back, we'll receive an object that allows us to get access to the actual value when it's available.
The Promise pattern allows for asynchronous actions such as AJAX requests in a simpler, less mentally challenging callback method.
The fetch API and method are not implemented in all browsers yet, so we'll need to use a polyfill to support browsers that do not support the fetch API. The create-react-app tool that we've been using to bootstrap our applications includes this polyfill out of the box: https://github.com/github/fetch.
What is a polyfill?
Not all browsers support certain features of JavasScript. A polyfill is a library that allows us to use upcoming features of JavaScript in current browsers that don't implement a new feature already.
The fetch method accepts two parameters — the URL that we are requesting, either as a string or as a Request object and an options object. The fetch method returns a Promise instance object. Let's explore how we use this method for our two different APIs.
Getting the user's location
In our lifecycle method, componentDidMount we make a call to a function called fetchIP (which we'll implement shortly):
componentDidMount: function() {
  this.fetchIP();
},
Our fetchIP method makes use of the fetch method to request information from http://freegeoip.net/.
The response from the fetch method is a Promise object.
Every Promise object has two important methods available: the then method and the catch method. The then method is what is called when the operation completed successfully. In the case of our AJAX request to freegeoip.net, this is where we handle the data that comes back from the request.
fetchIP: function() {
  fetch('//freegeoip.net/json/')
    .then((response)=>{
        return response.json();
    }).then((data)=>{
        let city = data.city;
        this.fetchWeatherData(city);
    }).catch((error)=>{
      console.log(error)
    });

},
Passed into the then method is a Response object. The Response object contains a json method which also returns a Promise that resolves with a JSON object. Since the json method returns a Promise, we can chain another then method and handle the JSON data in that function.
If the fetch request fails for any reason, we'll want to handle that error. We can handle it using the catch() method on the promise instance. For now, we'll just log the error message in our developer console.
The data that comes back from our request to the http://freegeoip.net API includes a city property. We'll send that information to our function fetchWeatherData which retrieves the information about the weather.
Getting location based weather
Our fetchWeatherData function also makes use of the fetch method. We use the fetch method to request weather information from http://openweathermap.org/. To make a request, we need to add the user's location to the query string of the URL:
const baseUrl = `http://api.openweathermap.org`;
const path = `/data/2.5/weather`;
const appId = `1fbaf6e0d29ea877ae5852504eef4e82`;
const query = `units=imperial&appid=${appId}`;
  fetch(`${baseUrl}${path}?q=${city}&${query}`)
Similar to our previous use of the fetch method, we want to get the data from the Response in JSON format. When the fetch method resolves we will return response.json() to get the data.
.then((response)=>{
  return response.json()})
.then((data)=>{
Now that we've received all the data we need to display our App Icon we can call this.setState and set the relevant data for our application.
.then((data)=>{
  var date = new Date();
  var time = date.getHours();
  this.setState({time:time,
    temp:Math.round(data.main.temp),
    location:city,
    weather_code:data.weather[0].id
  })
})
Our state object for this application contains will now contain 4 items:
time: The current hour of the day (allows us to animate the background to the right value)location: The user's current locationtemp: The current weather at the current location (in Fahrenheit)weather_code:The code for the current weather conditions (rainy, sunny, foggy, etc)
Once this.setState is called, our app icon is refreshed and the information is displayed.
ES6 Arrow Functions
You may have noticed that our two fetch method calls look slightly different. In our then methods (after calling the initial fetch method), we have a callback function, but it doesn't look like a typical callback function you may have seen writing JavaScript code in the past. A typical call using the fetch method would look something like this:
fetch('http://www.example.com')
  .then(function(response){
      //handle data here
  });
In our examples from above, our fetch methods look like this:
fetchIP: function() {
  fetch('//freegeoip.net/json/')
    .then((response)=>{
        return response.json();
    }).then((data)=>{
        let city = data.city;
        this.fetchWeatherData(city);
    }).catch((error)=>{
      console.log(error)
    });

},
fetchWeatherData(city){
  const baseUrl = `http://api.openweathermap.org`;
  const path = `/data/2.5/weather`;
  const appId = `1fbaf6e0d29ea877ae5852504eef4e82`;
  const query = `units=imperial&appid=${appId}`;
    fetch(`${baseUrl}${path}?q=${city}&${query}`)
    .then((response)=>{
      return response.json()})
    .then((data)=>{
      var date = new Date();
      var time = date.getHours();
      this.setState({time:time,
        temp:Math.round(data.main.temp),
        location:city,
        weather_code:data.weather[0].id
      })
    })
    .catch((error)=>{
        console.log(error)
    });
},
In the then method we've removed the function keyword and added => after the parentheses. It's a small, but important change that makes a big difference. This new (ES6) syntax is referred to as an "arrow function" and the main difference between an arrow function and a regular function in JavaScript is the value of this.
What is this?
The this keyword refers to the context in which a JavaScript function is called/executed. When we say "context" we mean a reference to the object that
"owns" the currently executing code1
In JavaScript, the value of this can be different values in different scenarios. For our purposes, we are going to look at the value of this in our function passed into the then method.
Prior to ES6, the value of this in a callback function as we've used them above was undefined. Using ES6 arrow functions sets this to be the current object that we are using -- in the case of our app icon, the Icon object. We can refer to the Icon object's methods inside our arrow functions, whereas without the arrow function we would get an error in the console.
Time and Weather based CSS styles
Animating the background
In our fetchWeatherData method, we get the current time of day using the Date object. Based on the current time of day, we animate the background of our app icon like so:
To achieve this effect, we create a div in the render method of our Icon component and give it the class name Sky:
render: function() {
  return (
    <div className="Icon" data-hour={this.state.time}>
      <div className="Sky"></div>
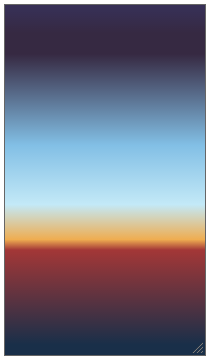
In our App.scss file, we'll create some rules for our Sky class. We'll give it a height 2400px and a width of 200px. We'll also add a gradient that stretches the full height of the div using the following linear-gradient CSS rule:
background: linear-gradient(to bottom, #373056 1%,#362942 8%,#362942 14%,#82bfe5 40%,#c3e9f7 57%,#efad51 67%,#a33737 70%,#192f49 97%);
This CSS rule creates a gradient that looks like this:
We now need to give our parent div (with class name Icon) some styles to create a "window" for our gradient styles. Our Icon div has a height of 200px so only a portion of the gradient will show.
To determine which portion of the gradient to display we can change the top CSS property on our Sky class. In our App.scss file, we've used a for loop, which isn't a normal CSS construct, but in Sass, we can write it like so:
@for $i from 0 through 23 {

  &[data-hour='#{$i}'] {
    .Sky {
      top: -100 * ($i - 1) + px;
    }
  }
}
When our App.scss file compiles it will generate CSS that looks like this:
.Icon[data-hour='0'] .Sky {
    top: 100px; }
  .Icon[data-hour='1'] .Sky {
    top: 0px; }
  .Icon[data-hour='2'] .Sky {
    top: -100px; }
  .Icon[data-hour='3'] .Sky {
    top: -200px; }
  .Icon[data-hour='4'] .Sky {
    top: -300px; }
  .Icon[data-hour='5'] .Sky {
    top: -400px; }
  .Icon[data-hour='6'] .Sky {
    top: -500px; }
  .Icon[data-hour='7'] .Sky {
    top: -600px; }
  .Icon[data-hour='8'] .Sky {
    top: -700px; }
  .Icon[data-hour='9'] .Sky {
    top: -800px; }
  .Icon[data-hour='10'] .Sky {
    top: -900px; }
  .Icon[data-hour='11'] .Sky {
    top: -1000px; }
  .Icon[data-hour='12'] .Sky {
    top: -1100px; }
  .Icon[data-hour='13'] .Sky {
    top: -1200px; }
  .Icon[data-hour='14'] .Sky {
    top: -1300px; }
  .Icon[data-hour='15'] .Sky {
    top: -1400px; }
  .Icon[data-hour='16'] .Sky {
    top: -1500px; }
  .Icon[data-hour='17'] .Sky {
    top: -1600px; }
  .Icon[data-hour='18'] .Sky {
    top: -1700px; }
  .Icon[data-hour='19'] .Sky {
    top: -1800px; }
  .Icon[data-hour='20'] .Sky {
    top: -1900px; }
  .Icon[data-hour='21'] .Sky {
    top: -2000px; }
  .Icon[data-hour='22'] .Sky {
    top: -2100px; }
  .Icon[data-hour='23'] .Sky {
    top: -2200px; }
For every hour of the day, the portion of the gradient that is displayed changes by 100px.
To set the data-hour attribute properly, we get the current hour using the Date object in JavaScript in our App.js file:
.then((data)=>{
  var date = new Date();
  var time = date.getHours();
Then we call setState to update the hour and use the current state of our Icon object to set the data-hour attribute properly:
<div className="Icon" data-hour={this.state.time}>
Displaying the weather icon
The openweathermap.org API gives us various codes depending on the weather for the location. For example, code 200 means a thunderstorm and code 741 means fog. We can use the icon library from this Github repository: https://erikflowers.github.io/weather-icons/ to display some nice looking icons depending on the weather code. This icon library maps it's class names directly to the Open Weather API codes which will make it easy to add these classes to our code. We pass down our weather code information via props to our WeatherIcon component:
<div className="Sky"></div>
Inside the render function of our WeatherIcon component we use the Date object to determine if the current hour is night or day and then generate the correct class name for our icon based on the time of day and the weather code that was given to us:
render: function() {
  let timeOfDay =
    (this.props.timeOfDay > 7 && this.props.timeOfDay < 18)
    ? 'day' : 'night';
  let className = 'WeatherIcon wi'
  className += 'wi-owm-'+timeOfDay+'-'+this.props.weatherCode;
  return (<i className={className}></i>);
}
Try it out!
Check out the Codepen example:
The complete source for this article is also available on Github here.
To start the app, download the code,
cdinto the project directory and type:npm install npm start
Want to be a pro at building UIs in React?
This post is the first of many that will explain step-by-step how to create professional UI components in React. If you want to become a pro at building UIs in React, put in your email below and we'll notify you as each post is completed.

Learn React the right way
The up-to-date, in-depth, complete guide to React and friends.
Download the first chapter