
Your first React Web Application
Building Product Hunt
In this chapter, you're going to get a crash course on React by building a simple voting application inspired by Product Hunt. You'll become familiar with how React approaches front-end development and all the fundamentals necessary to build an interactive React app from start to finish. Thanks to React's core simplicity, by the end of the chapter you'll already be well on your way to writing a variety of fast, dynamic interfaces.
We'll focus on getting our React app up and running fast. We take a deeper look at concepts covered in this section throughout the book.
Setting up your development environment
Code editor
As you'll be writing code throughout this book, you'll need to make sure you have a code editor you're comfortable working with. If you don't already have a preferred editor, we recommend installing VS Code.
Node.js and npm
For all the projects in this book, we'll need to make sure we have a working Node.js development environment along with npm.
There are a couple different ways you can install Node.js so please refer to the Node.js website for detailed information: https://nodejs.org/download/
If you're on a Mac, your best bet is to install Node.js directly from the Node.js website instead of through another package manager (like Homebrew). Installing Node.js via Homebrew is known to cause some issues.
The Node Package Manager (npm for short) is installed as a part of Node.js. To check if npm is available as a part of our development environment, we can open a terminal window and type:
$ npm -v
If a version number is not printed out and you receive an error, make sure to download a Node.js installer that includes npm.
Install Git
The app in this chapter requires Git to install some third-party libraries.
If you don't have Git installed, see these instructions for installing Git for your platform.
After installing Git, we recommend restarting your computer.
Browser
Last, we highly recommend using the Google Chrome Web Browser to develop React apps. We'll use the Chrome developer toolkit throughout this book. To follow along with our development and debugging we recommend downloading it now.
Special instruction for Windows users
All the code in this book has been tested on Windows 10 with PowerShell.
Ensure IIS is installed
If you're on a Windows machine and have yet to do any web development on it, you may need to install IIS (Internet Information Services) in order to run web servers locally.
See this tutorial for installing IIS.
JavaScript ES6/ES7
JavaScript is the language of the web. It runs on many different browsers, like Google Chrome, Firefox, Safari, Microsoft Edge, and Internet Explorer. Different browsers have different JavaScript interpreters which execute JavaScript code.
Its widespread adoption as the internet's client-side scripting language led to the formation of a standards body which manages its specification. The specification is called ECMAScript or ES.
The 5th edition of the specification is called ES5. You can think of ES5 as a "version" of the JavaScript programming language. Finalized in 2009, ES5 was adopted by all major browsers within a few years.
The 6th edition of JavaScript is referred to as ES6. Finalized in 2015, the latest versions of major browsers are still finishing adding support for ES6 as of 2017. ES6 is a significant update. It contains a whole host of new features for JavaScript, almost two dozen in total. JavaScript written in ES6 is tangibly different than JavaScript written in ES5.
ES7, a much smaller update that builds on ES6, was ratified in June 2016. ES7 contains only two new features.
As the future of JavaScript, we want to write our code in ES6/ES7 today. But we also want our JavaScript to run on older browsers until they fade out of widespread use. We see later in this chapter how we can enjoy the benefits of ES6/ES7 today while still supporting the vast majority of the world's browsers.
This book is written with JavaScript ES7. Because ES6 ratified a majority of these new features, we'll commonly refer to these new features as ES6 features.
We've included an appendix on the ES6 syntax that we use, "Appendix B: ES6." We'll often refer to the appendix when encountering ES6 syntax for the first time, but if ever syntax seems unfamiliar to you it's worth checking Appendix B to see if it's new ES6 JavaScript syntax.
ES6 is sometimes referred to as ES2015, the year of its finalization. ES7, in turn, is often referred to as ES2016.
Getting started
Sample Code
All the code examples you find in each chapter are available in the code package that came with the book. In that code package you'll find completed versions of each app as well as boilerplates that we will use to build those apps together. Each chapter provides detailed instruction on how to follow along on your own.
While coding along with the book is not necessary, we highly recommend doing so. Playing around with examples and sample code will help solidify and strengthen concepts.
Previewing the application
We'll be building a basic React app that will allow us to touch on React's most important concepts at a high-level before diving into them in subsequent sections. Let's begin by taking a look at a working implementation of the app.
Open up the sample code folder that came with the book. Change to the voting_app/ directory in the terminal:
$ cd voting_app/
If you're not familiar with
cd, it stands for "change directory." If you're on a Mac, do the following to open terminal and change to the proper directory:
- Open up
/Applications/Utilities/Terminal.app.- Type
cd, without hitting enter.- Tap the spacebar.
- In the Finder, drag the
voting_app/folder on to your terminal window.- Hit Enter.
Your terminal is now in the proper directory.
Throughout the book, a code block starting with a
$signifies a command to be run in your terminal.
First, we'll need to use npm to install all our dependencies:
$ npm install
With our dependencies installed, we can boot the server using the npm start command
$ npm start
The boot process will print some text to the console:

In addition, your browser might automatically launch and open the app. If it doesn't, you can view the running application at the URL http://localhost:3000:
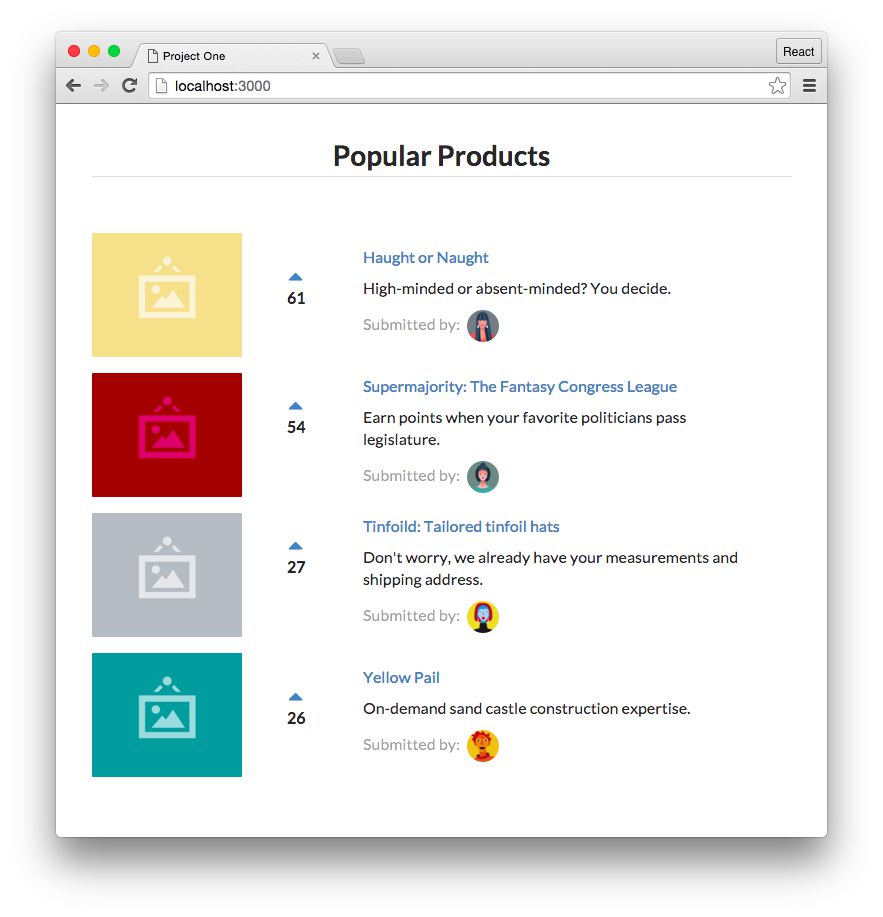
This demo app is a site like Product Hunt or Reddit. These sites have lists of links that users can vote on. Like those sites, in our app we can up-vote products. All products are sorted instantaneously by number of votes.
The keyboard command to quit a running Node server is CTRL+C.
Prepare the app
In the terminal, run ls to see the project's layout:
$ ls
README.md
disable-browser-cache.js
nightwatch.json
node_modules/
package.json
public/
tests/
If you're running on macOS or Linux, you can run
ls -1pto format your output as we do above.
Node apps contain a package.json which specifies the dependencies of the project. When we ran npm install, npm used our package.json to determine which dependencies to download and install. It installed them to the folder node_modules/.
We explore the format of
package.jsonin later chapters.
The code we'll be working with is inside the folder public/. Look inside that folder:
$ ls public
favicon.ico
images/
index.html
js/
semantic-dist/
style.css
vendor/
The general layout here is a common one for web apps. Inside public/ is index.html, the file that we serve to browsers that request our website. As we'll see shortly, index.html is the centerpiece of our app. It loads in the rest of our app's assets.
Let's look inside public/js next:
$ ls public/js
app-1.js
app-2.js
app-3.js
app-4.js
app-5.js
app-6.js
app-7.js
app-8.js
app-9.js
app-complete.js
app.js
seed.js
Inside public/js is where we'll put our app's JavaScript. We'll be writing our React app inside app.js. app-complete.js is the completed version of the app that we're working towards, which we viewed a moment ago.
In addition, we've included each version of app.js as we build it up throughout this chapter (app-1.js, app-2.js, etc). Each code block in this chapter will reference which app version you can find it in. You can copy and paste longer code insertions from these app versions into your app.js.
All projects include a handy
README.mdthat have instructions on how to run them.
To get started, we'll ensure app-complete.js is no longer loaded in index.html. We'll then have a blank canvas to begin work inside app.js.
Open up public/index.html in your text editor. It should look like this:
<!DOCTYPE html>
<html>

  <head>
    <meta charset="utf-8">
    <title>Project One</title>
    <link rel="stylesheet" href="./semantic-dist/semantic.css" />
    <link rel="stylesheet" href="./style.css" />
    <script src="vendor/babel-standalone.js"></script>
    <script src="vendor/react.js"></script>
    <script src="vendor/react-dom.js"></script>
  </head>

  <body>
    <div class="main ui text container">
      <h1 class="ui dividing centered header">Popular Products</h1>
      <div id="content"></div>
    </div>
    <script src="./js/seed.js"></script>
    <script src="./js/app.js"></script>
    <!-- Delete the script tag below to get started. -->
    <script
      type="text/babel"
      data-plugins="transform-class-properties"
      src="./js/app-complete.js"
    ></script>
  </body>

</html>
We'll go over all the dependencies being loaded under the <head> tag later. The heart of the HTML document is these few lines here:
    <div class="main ui text container">
      <h1 class="ui dividing centered header">Popular Products</h1>
      <div id="content"></div>
    </div>
For this project, we're using Semantic UI for styling.
Semantic UI is a CSS framework, much like Twitter's Bootstrap. It provides us with a grid system and some simple styling. You don't need to know Semantic UI in order to use this book. We'll provide all the styling code that you need. At some point, you might want to check out the docs Semantic UI docs to get familiar with the framework and explore how you can use it in your own projects.
The class attributes here are just concerned with style and are safe to ignore. Stripping those away, our core markup is succinct:
<div>
  <h1>Popular Products</h1>
  <div id="content"></div>
</div>
We have a title for the page (h1) and a div with an id of content. This div is where we will ultimately mount our React app. We'll see shortly what that means.
The next few lines tell the browser what JavaScript to load. To start building our own application, let's remove the ./app-complete.js script tag completely:
<script src="./js/seed.js"></script>
<script src="./js/app.js"></script>
<!-- Delete the script tag below to get started. -->
<!-- leanpub-start-delete -->
<script
  type="text/babel"
  data-plugins="transform-class-properties"
  src="./js/app-complete.js"
></script>
<!-- leanpub-end-delete -->
After we save our updated index.html and reload the web browser, we'll see that our app has disappeared.
What's a component?
Building a React app is all about components. An individual React component can be thought of as a UI component in an app. We can break apart the interface of our app into two classes of components:
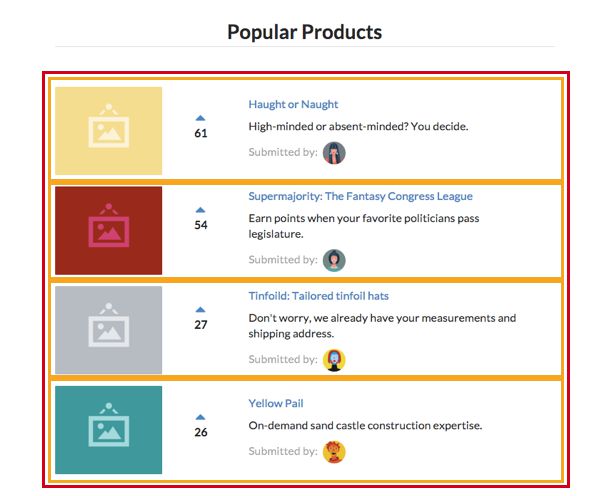
We have a hierarchy of one parent component and many child components. We'll call these ProductList and Product, respectively:
ProductList: Contains a list of product componentsProduct: Displays a given product
Not only do React components map cleanly to UI components, but they are self-contained. The markup, view logic, and often component-specific style is all housed in one place. This feature makes React components reusable.
Furthermore, as we'll see in this chapter and throughout this book, React's paradigm for component data flow and interactivity is rigidly defined. In React, when the inputs for a component change, the framework simply re-renders that component. This gives us a robust UI consistency guarantee:
With a given set of inputs, the output (how the component looks on the page) will always be the same.
Our first component
Let's start off by building the ProductList component. We'll write all our React code for the rest of this chapter inside the file public/js/app.js. Let's open app.js and insert the component:
/ leanpub-start-insert
class ProductList extends React.Component {
  render() {
    return (
      <div className='ui unstackable items'>
        Hello, friend! I am a basic React component.
      </div>
    );
  }
}
// leanpub-end-insert
React components are ES6 classes that extend the class React.Component. We're referencing the React variable. index.html loads the React library for us so we're able to reference it here:
<script src="vendor/react.js"></script>
Our ProductList class has a single method, render(). render() is the only required method for a React component. React uses the return value from this method to determine what to render to the page.
While JavaScript is not a classical language, ES6 introduced a class declaration syntax. ES6 classes are syntactical sugar over JavaScript's prototype-based inheritance model.
We cover the important details you need to know about classes with respect to building React components. If you'd like to learn more about ES6 classes, refer to the docs on MDN.
There are two ways to declare React components:
(1) As ES6 classes (as above)
(2) Function components
An example of using an ES6 class:
class HelloWorld extends React.Component {
    render() { return <p>Hello, world!</p>; }
}
The same component written in a "functional component" style:
function HelloWorld() {
  return <p>Hello, world!</p>;
}
At the time of writing, both types of declarations are in widespread use. While they both do essentially the same thing, there are some important differences that we'll get to later in the book.
We'll be using ES6 class components through much of the book, but we'll be using function components from time-to-time as well. While it might seem cleaner to just pick one, you'll encounter (and use) both in your real-world work. So we'll cover both.
This page is a preview of Fullstack React: The Complete Book on ReactJS and Friends.
Get the rest of this chapter plus hundreds of pages of React instruction, 5 sample projects, a screencast, and more.
