
Intermediate Redux
In the last chapter, we learned about a specific Flux implementation, Redux. By building our own Redux store from scratch and integrating the store with React components, we got a feel for how data flows through a Redux-powered React app.
In this chapter, we build on these concepts by adding additional features to our chat application. Our chat app will begin to look like a real-world messaging interface.
In the process, we'll explore strategies for handling more complex state management. We'll also use a couple of functions directly from the redux library.
Preparation
Inside of the code download that came with the book, navigate to redux/chat_intermediate:
$ cd redux/chat_intermediate
This app is setup identically to the chat app in the last chapter, powered by create-react-app.
$ ls
README.md
nightwatch.json
package.json
public
semantic
semantic.json
src
tests
yarn.lock
Checking out src/:
$ ls src/
App.js
complete
index.css
index.js
Again, App.js is where we'll be working. It contains the app as we left it in the previous chapter. And again, complete/ contains each iteration of App.js as we build it up over the next two chapters. index.js currently includes the final version of App.js and mounts it to the DOM.
As usual, run npm install to install all of the dependencies for the project:
$ npm install
And then execute npm start to boot the server:
$ npm start
View the completed app by visiting http://localhost:3000 in your browser.
In this iteration of the chat app, our app has threads. Each message belongs to a particular thread with another user. We can switch between threads using the tabs at the top.
As in the last iteration, note that we can add messages with the text field at the bottom as well as delete messages by clicking on them.
To begin, let's swap in App.js in src/index.js:
import React from "react";
import ReactDOM from "react-dom";
// leanpub-start-insert
import App from "./App";
// leanpub-end-insert
Using createStore() from the redux library
In the last chapter, we implemented our own version of createStore(). At the top of src/App.js, you'll find the createStore() function just as we left it. The store object that this function creates has three methods: getState(), dispatch(), and subscribe().
As we noted in the last chapter, our createStore() function is very similar to that which ships with the redux library. Let's remove our implementation and use the one from redux.
In package.json, we already include the redux library:
"redux": "3.6.0",
We can import the createStore() function from the library:
import { createStore } from 'redux';
Now we can remove our own createStore() definition from App.js.
Try it out
To verify everything is working properly, ensure the server is running:
$ npm start
And then check out the app on http://localhost:3000.
Behavior for the app will be the same as we left it in the previous chapter. We can add new messages and click on them to delete.
There are a couple subtle behavioral differences between our createStore() and the one that ships with the Redux library. Our app has yet to touch on them. We'll address these differences when they come up.
Representing messages as objects in state
Our state up to this point has been simple. State has been an object, with a messages property. Each message has been a string:
// Example of our state object so far
{
  messages: [
    'Roger. Eagle is undocked',
    'Looking good.',
  ],
}
To bring our app closer to a real-world chat app, each message will need to carry more data. For example, we might want each message to specify when it was sent or who sent it. To support this, we can use an object to represent each message as opposed to a string.
For now, we'll add two properties to each message, timestamp and id:
// Example of our new state object
{
  messages: [
    // An example message
    // messages are now objects
    {
      text: 'Roger. Eagle is undocked',
      timestamp: '1461974250213',
      id: '9da98285-4178',
    },
    // ...
  ]
}
The
Date.now()function in JavaScript returns a number representing the number of milliseconds since January 1, 1970 00:00 UTC. This is called "Epoch" or "Unix" time. We're using this representation for thetimestampproperty above.You can use a JavaScript library like Moment.js to render more human-friendly timestamps.
In order to support messages that are objects, we'll need to tweak our reducer as well as our React components.
Updating ADD_MESSAGE
The reducer function we wrote in the last chapter handles two actions, ADD_MESSAGE and DELETE_MESSAGE. Let's start by updating the ADD_MESSAGE action handler.
As you recall, the ADD_MESSAGE action currently contains a message property:
{
  type: 'ADD_MESSAGE',
  message: 'Looking good.',
}
reducer() receives this action and returns a new object with a messages property. messages is set to a new array that contains the previous state.messages with the new message appended to it:
function reducer(state, action) {
  if (action.type === 'ADD_MESSAGE') {
    return {
      messages: state.messages.concat(action.message),
    };
Let's tweak our ADD_MESSAGE action so that it uses the property name text instead of message:
// Example of what our new ADD_MESSAGE will look like
{
  type: 'ADD_MESSAGE',
  // leanpub-start-insert
  text: 'Looking good.',
  // leanpub-end-insert
}
text matches the property name that we'll be using for the message object.
Next, let's modify our reducer's ADD_MESSAGE handler so that it uses message objects as opposed to string literals.
We will give each message object a unique identifier. We include the uuid library in our package.json. Let's import it at the top of src/App.js:
import uuid from 'uuid';
Next, let's modify ADD_MESSAGE so that it creates a new object to represent the message. It will use action.text for the text property and then generate a timestamp and an id:
  if (action.type === 'ADD_MESSAGE') {
    const newMessage = {
      text: action.text,
      timestamp: Date.now(),
      id: uuid.v4(),
    };
Date.now()is part of the JavaScript standard library. It returns the current time in the Unix time format, in milliseconds.
We'll use concat again. This time, we'll use concat to return a new array that contains state.messages and our newMessage object:
    return {
      messages: state.messages.concat(newMessage),
    };
Our modified ADD_MESSAGE handler in full:
  if (action.type === 'ADD_MESSAGE') {
    const newMessage = {
      text: action.text,
      timestamp: Date.now(),
      id: uuid.v4(),
    };
    return {
      messages: state.messages.concat(newMessage),
    };
Updating DELETE_MESSAGE
The DELETE_MESSAGE action up until now contained an index, the index of the message in the state.messages array to be deleted:
{
  type: 'DELETE_MESSAGE',
  index: 5,
}
Now that all of our messages have a unique id, we can use that:
// Example of what our new DELETE_MESSAGE will look like
{
  type: 'DELETE_MESSAGE',
  id: '9da98285-4178',
}
To remove the message from state.messages, we can use Array's filter() method. filter() returns a new array containing all of the elements that "pass" the supplied test function:
  } else if (action.type === 'DELETE_MESSAGE') {
    return {
      messages: state.messages.filter((m) => (
        m.id !== action.id
      ))
Here, we're building a new array containing every object that does not have an id that corresponds to the action's id.
With these changes in place, our reducers are ready to handle our new message objects. We'll update our React components next. We need to update both the actions they emit as well as how they render messages.
Updating the React components
MessageInput dispatches an ADD_MESSAGE action whenever the user clicks its submit button. We'll need to modify this component so that it uses the property name text as opposed to message for the action:
  handleSubmit = () => {
    store.dispatch({
      type: 'ADD_MESSAGE',
      text: this.state.value,
    });
    this.setState({
      value: '',
    });
  };
MessageView dispatches a DELETE_MESSAGE action whenever the user clicks on a message. We need to tweak the action it dispatches so that it uses the property id as opposed to index:
class MessageView extends React.Component {
  handleClick = (id) => {
    store.dispatch({
      type: 'DELETE_MESSAGE',
      id: id,
    });
  };
Then, we need to change the render() function for MessageView. We'll modify the HTML for each message so that it also includes the timestamp property. To render the text of the message, we call message.text:
  render() {
    const messages = this.props.messages.map((message, index) => (
      <div
        className='comment'
        key={index}
        onClick={() => this.handleClick(message.id)} // Use `id`
      >
        <div className='text'> {/* Wrap message data in `div` */}
          {message.text}
          <span className='metadata'>@{message.timestamp}</span>
        </div>
      </div>
    ));
Note that we now pass in message.id as opposed to index to this.handleClick(). We wrap the display logic for each message inside a div with class text.
Our reducers and React components are now on the same page. We're using our new representation of both the state and actions.
Save App.js. If your server isn't already running, boot it:
$ npm start
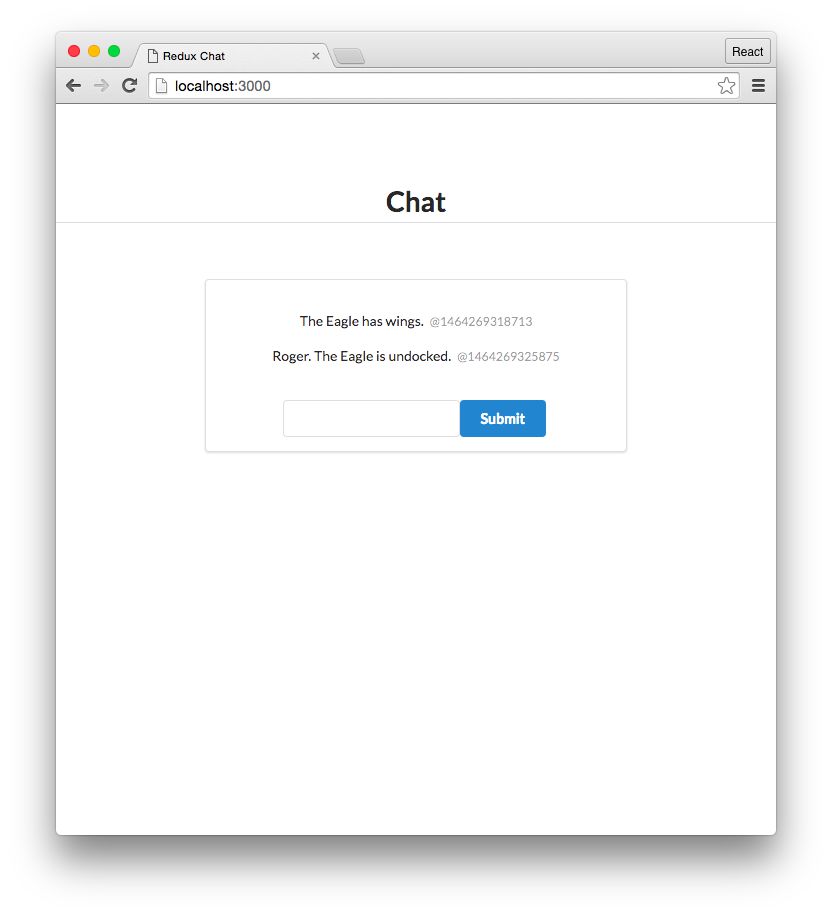
Navigate to http://localhost:3000. When you add messages, a timestamp should appear to the right of each message. You can also delete them as before by clicking on them:
Introducing threads
Our state now uses message objects, which will allow us to carry information about each message in our app (like timestamp).
But in order for our app to begin reflecting a real-world chat app, we'll need to introduce another concept: threads.
In a chat app, a "thread" is a distinct set of messages. A thread is a conversation between you and one or more other users:
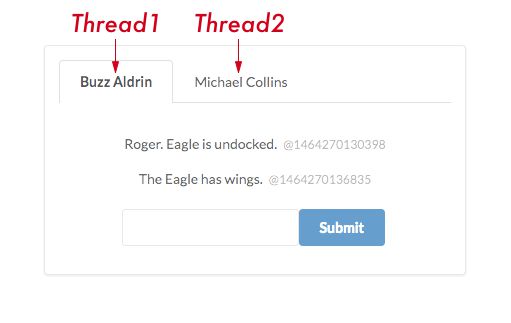
As the completed version of the app demonstrated, our app will use tabs to enable a user to switch between threads. Each message belongs to a single thread:
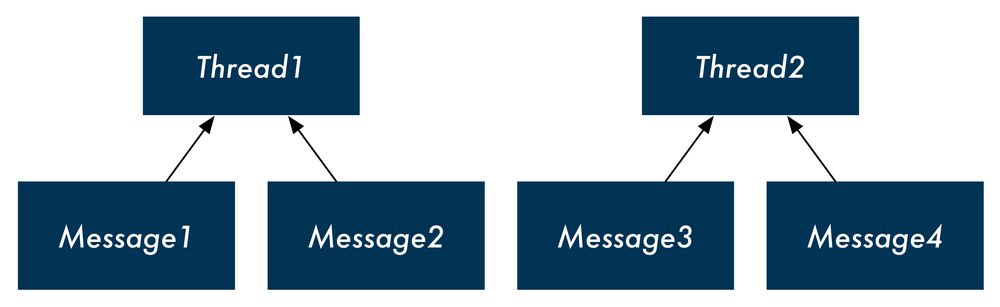
To support threads, we'll update the shape of our state object. The top-level property will now be threads, an array of thread objects. Each thread object will have a messages property which will contain the message object we introduced to the system in the previous section:
{
  threads: [
    {
      id: 'd7902357-4703', // UUID of the thread
      title: 'Buzz Aldrin', // Who the conversation is with
      messages: [
        {
          id: 'e8596e6b-97cc',
          text: 'Twelve minutes to ignition.',
          timestamp: 1462122634882,
        },
        // ... other messages with Buzz Aldrin
      ]
    },
    // ... other threads (with other users)
  ],
}
Supporting threads in initialState
To support threads, let's first update our initial state.
At the moment, we're initializing state to an object with a messages property:
const initialState = { messages: [] };
Now we want our top-level property to be threads. We could initialize state to this:
But that would quickly add a significant amount of complexity to our app. Not only do we need to update our reducers to support our new thread-driven state, but we'd need to also add some way to create new threads.
For our app to reflect a real-world chat app, we'd need the ability to create new threads in the future. But for now, we can take a smaller step by just initializing our state with a hard-coded set of threads.
Modify initialState now, initializing it to an object with a threads property. We'll have two thread objects in state:
const initialState = {
  activeThreadId: '1-fca2', // New state property
  threads: [ // Two threads in state
    {
      id: '1-fca2', // hardcoded pseudo-UUID
      title: 'Buzz Aldrin',
      messages: [
        { // This thread starts with a single message already
          text: 'Twelve minutes to ignition.',
          timestamp: Date.now(),
          id: uuid.v4(),
        },
      ],
    },
    {
      id: '2-be91',
      title: 'Michael Collins',
      messages: [],
    },
  ],
};
Because we're hardcoding the
idfor our threads for now, we're using a clipped version of UUID for each of them.
Notice our initial state object contains another top-level property, activeThreadId. Our front-end displays only one thread at a time. Our view needs to know which thread to display. In addition to threads and messages, our app should also have this additional piece of state.
Here, we initialize it to our first thread which has an id of '1-fca2'.
We now have an initial state object that our React components can use to render a threaded version of our app. We'll update the components first to render from this new state shape.
Our app will be locked at this initial state though; we won't be able to add or delete any messages or switch between tabs. Once we confirm the views look good, we'll update our actions and our reducer to support our new thread-based chat app.
For now, we're initializing the first thread object with a single message already under
messages. This will enable us to verify our React components are properly rendering a thread with a message ahead of our reducers supporting our updatedADD_MESSAGEaction.
Supporting threads in the React components
To enable switching between threads in the app, the interface will have tabs above the messages view. We'll need to both add new React components and modify existing ones to support this.
Looking at the completed version of this chapter's chat app, we can identify the following components:
This page is a preview of Fullstack React: The Complete Book on ReactJS and Friends.
Get the rest of this chapter plus hundreds of pages of React instruction, 5 sample projects, a screencast, and more.
