
Components
A time-logging app
In the last chapter, we described how React organizes apps into components and how data flows between parent and child components. And we discussed core concepts such as how we manage state and pass data between components using props.
In this chapter, we construct a more intricate application. We investigate a pattern that you can use to build React apps from scratch and then put those steps to work to build an interface for managing timers.
In this time-tracking app, a user can add, delete, and modify various timers. Each timer corresponds to a different task that the user would like to keep time for:

This app will have significantly more interactive capabilities than the one built in the last chapter. This will present us with some interesting challenges that will deepen our familiarity with React's core concepts.
Getting started
As with all chapters, before beginning make sure you've downloaded the book's sample code and have it at the ready.
Previewing the app
Let's begin by playing around with a completed implementation of the app.
In your terminal, cd into the time_tracking_app directory:
$ cd time_tracking_app
Use npm to install all the dependencies:
$ npm install
Then boot the server:
$ npm start
Now you can view the app in your browser. Open your browser and enter the URL http://localhost:3000.
Play around with it for a few minutes to get a feel for all the functionality. Refresh and note that your changes have been persisted.
Note that this app uses a different web server than the one used in the voting app. The app won't automatically launch in your browser or automatically refresh when you make changes.
Prepare the app
In your terminal, run ls to see the project's layout:
$ ls
README.md
data.json
nightwatch.json
node_modules/
package.json
public/
semantic.json
server.js
tests/
There are a few organizational changes from the last project.
First, notice that there is now a server.js in this project. In the last chapter, we used a pre-built Node package (called live-server) to serve our assets.
This time we have a custom-built server which serves our assets and also adds a persistence layer. We will cover the server in detail in the next chapter.
When you visit a website, assets are the files that your browser downloads and uses to display the page.
index.htmlis delivered to the browser and inside itsheadtags it specifies which additional files from the server the browser needs to download.In the last project, our assets were
index.htmlas well as our stylesheets and images.In this project, everything under
public/is an asset.
In the voting app, we loaded all of our app's initial data from a JavaScript variable, loaded in the file seed.js.
This time, we're going to eventually store it in the text file data.json. This brings the behavior a bit closer to a database. By using a JSON file, we can make edits to our data that will be persisted even if the app is closed.
JSON stands for JavaScript Object Notation. JSON enables us to serialize a JavaScript object and read/write it from a text file.
If you're not familiar with JSON, take a look at
data.json. Pretty recognizable, right? JavaScript has a built-in mechanism to parse the contents of this file and initialize a JavaScript object with its data.
Peek inside public:
$ cd public
$ ls
The structure here is the same as the last project:
favicon.ico
index.html
js/
semantic/
style.css
vendor/
Again, index.html is the centerpiece of the app. It's where we include all of our JavaScript and CSS files and where we specify the DOM node where we'll ultimately mount our React app.
We're using SemanticUI again here for styling. All of SemanticUI's assets are underneath semantic/.
All our JavaScript files are inside of js/:
$ ls js/
app-1.js
app-2.js
app-3.js
app-4.js
app-5.js
app-6.js
app-7.js
app-8.js
app-9.js
app-complete.js
app.js
client.js
helpers.js
We'll be building the app inside app.js. The completed version of the app which we reach in the next chapter is inside app-complete.js. Each step we take along the way is included here: app-1.js, app-2.js, and so forth. Like the last chapter, code examples in the book are titled with the file in which you can find that example.
Furthermore, we'll be using a couple additional JavaScript files for this project. As we'll see, client.js contains functions that we'll use to interface with our server in the next chapter. helpers.js contains some helper functions that our components will use.
As before, our first step is to ensure app-complete.js is no longer loaded in index.html. We'll instead load the empty file app.js.
Open up index.html:
<!DOCTYPE html>
<html>

  <head>
    <meta charset="utf-8">
    <title>Project Two: Timers</title>
    <link rel="stylesheet" href="./semantic-dist/semantic.css" />
    <link rel="stylesheet" href="style.css" />
    <script src="vendor/babel-standalone.js"></script>
    <script src="vendor/react.js"></script>
    <script src="vendor/react-dom.js"></script>
    <script src="vendor/uuid.js"></script>
    <script src="vendor/fetch.js"></script>
  </head>

  <body>
    <div id="main" class="main ui">
      <h1 class="ui dividing centered header">Timers</h1>
      <div id="content"></div>
    </div>
    <script type="text/babel" src="./js/client.js"></script>
    <script type="text/babel" src="./js/helpers.js"></script>
    <script
      type="text/babel"
      data-plugins="transform-class-properties"
      src="./js/app.js"
    ></script>
    <!-- Delete the script tag below to get started. -->
    <script
      type="text/babel"
      data-plugins="transform-class-properties"
      src="./js/app-complete.js"
    ></script>
  </body>

</html>
Overall, this file is very similar to the one we used in our voting app. We load in our dependencies within the head tags (the assets). Inside of body we have a few elements. This div is where we will ultimately mount our React app:
<div id="content"></div>
And this script tag is where we instruct the browser to load app.js into the page:
    <script
      type="text/babel"
      data-plugins="transform-class-properties"
      src="./js/app.js"
    ></script>
We're using the Babel plugin transform-class-properties again in this chapter. We discussed this plugin at the end of the previous chapter.
Do as the comment says and delete the script tag that loads app-complete.js:
<script
  type="text/babel"
  data-plugins="transform-class-properties"
  src="./js/app.js"
></script>
<!-- Delete the script tag below to get started. -->
<!-- leanpub-start-delete -->
<script
  type="text/babel"
  data-plugins="transform-class-properties"
  src="./js/app-complete.js"
></script>
<!-- leanpub-end-delete -->
Save index.html. If you reload the page now, you'll see the app has disappeared.
Breaking the app into components
As we did with our last project, we begin by breaking our app down into its components. Again, visual components often map tightly to their respective React components. Let's examine the interface of our app:
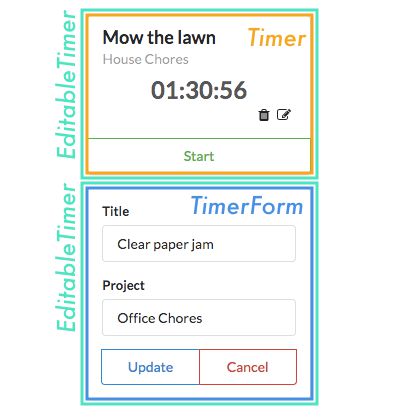
In the last project, we had ProductList and Product components. The first contained instances of the second. Here, we spot the same pattern, this time with TimerList and Timer components:
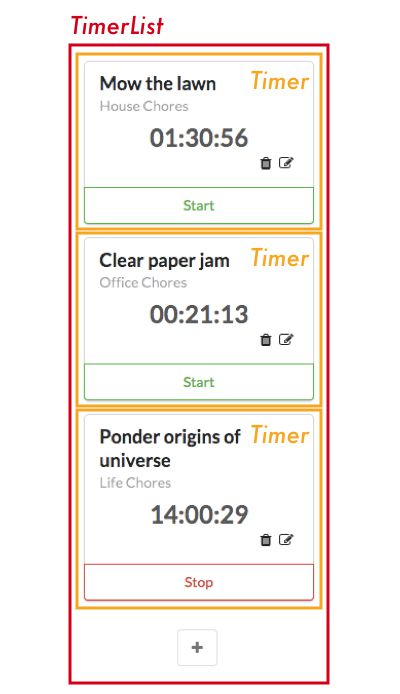
However, there's one subtle difference: This list of timers has a little "+" icon at the bottom. As we saw, we're able to add new timers to the list using this button. So, in reality, the TimerList component isn't just a list of timers. It also contains a widget to create new timers.
Think about components as you would functions or objects. The single responsibility principle applies. A component should, ideally, only be responsible for one piece of functionality. So, the proper response here is for us to shrink TimerList back into its responsibility of just listing timers and to nest it under a parent component. We'll call the parent TimersDashboard. TimersDashboard will have TimerList and the "+"/create form widget as children:
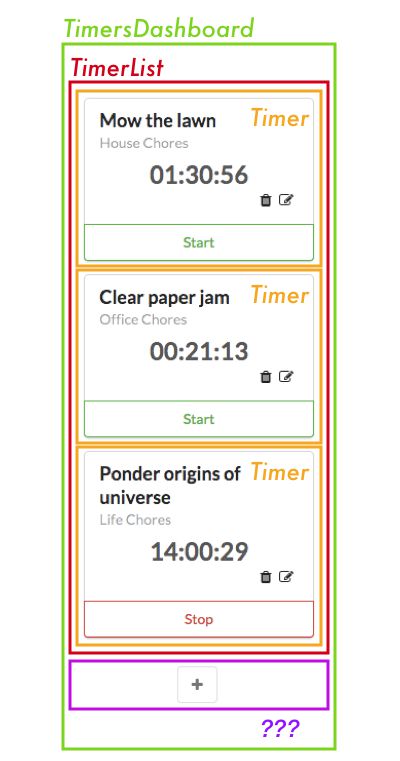
Not only does this separation of responsibilities keep components simple, but it often also improves their re-usability. In the future, we can now drop the TimerList component anywhere in the app where we just want to display a list of timers. This component no longer carries the responsibility of also creating timers, which might be a behavior we want to have for just this dashboard view.
How you name your components is indeed up to you, but having some consistent rules around language as we do here will greatly improve code clarity.
In this case, developers can quickly reason that any component they come across that ends in the word
Listsimply renders a list of children and no more.
The "+"/create form widget is interesting because it has two distinct representations. When the "+" button is clicked, the widget transmutes into a form. When the form is closed, the widget transmutes back into a "+" button.
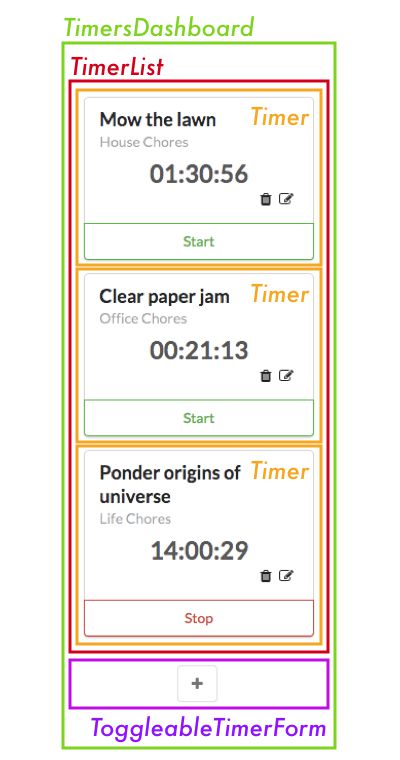
There are two approaches we could take. The first one is to have the parent component, TimersDashboard, decide whether or not to render a "+" component or a form component based on some piece of stateful data. It could swap between the two children. However, this adds more responsibility to TimersDashboard. The alternative is to have a new child component own the single responsibility of determining whether or not to display a "+" button or a create timer form. We'll call it ToggleableTimerForm. As a child, it can either render the component TimerForm or the HTML markup for the "+" button.
At this point, we've carved out four components:
Now that we have a sharp eye for identifying overburdened components, another candidate should catch our eye:
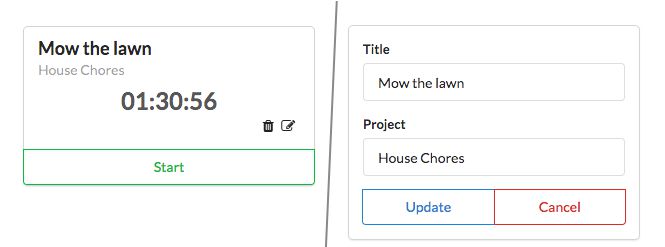
The timer itself has a fair bit of functionality. It can transform into an edit form, delete itself, and start and stop itself. Do we need to break this up? And if so, how?
Displaying a timer and editing a timer are indeed two distinct UI elements. They should be two distinct React components. Like ToggleableTimerForm, we need some container component that renders either the timer's face or its edit form depending on if the timer is being edited.
We'll call this EditableTimer. The child of EditableTimer will then be either a Timer component or the edit form component. The form for creating and editing timers is very similar, so let's assume that we can use the component TimerForm in both contexts:
As for the other functionality of the timer, like the start and stop buttons, it's a bit tough to determine at this point whether or not they should be their own components. We can trust that the answers will be more apparent after we've written some code.
Working back up the component tree, we can see that the name TimerList would be a misnomer. It really is a EditableTimerList. Everything else looks good.
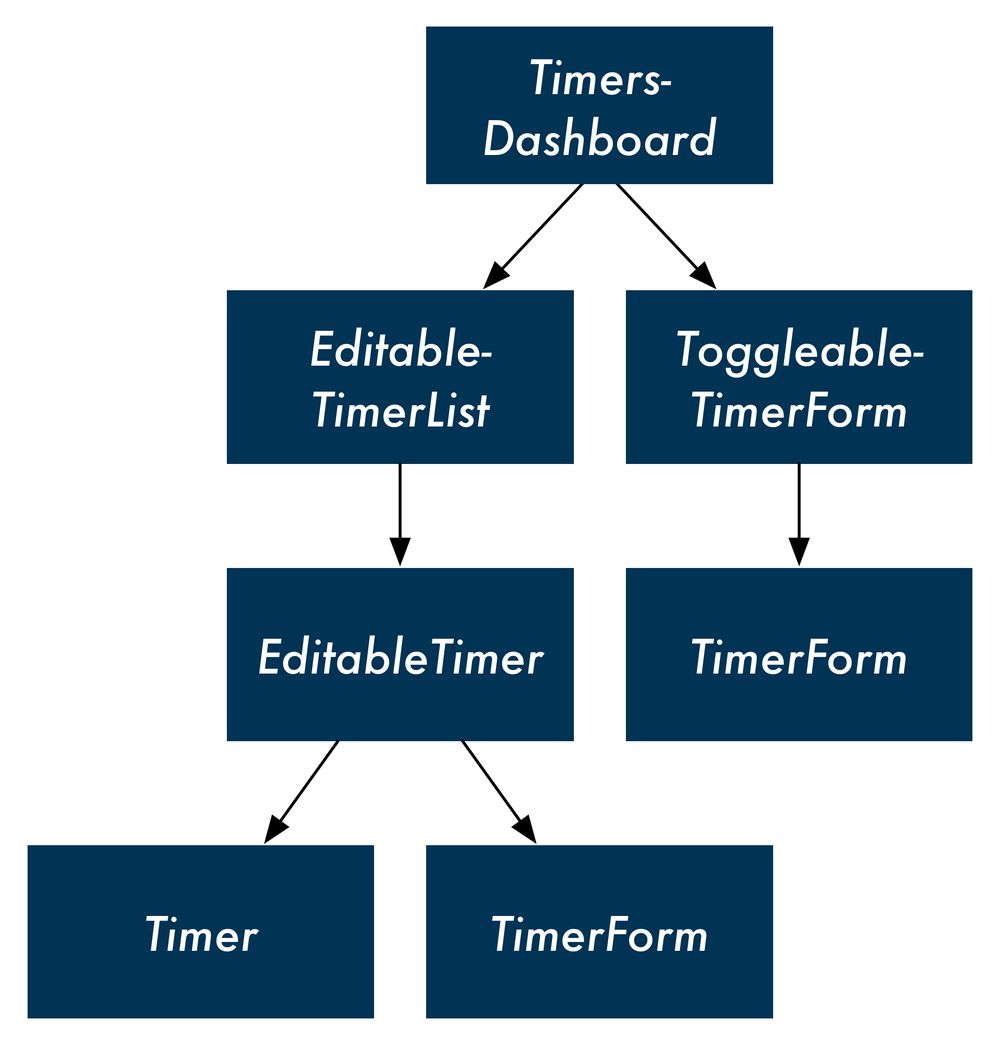
So, we have our final component hierarchy, with some ambiguity around the final state of the timer component:

-
TimersDashboard: Parent container-
EditableTimerList: Displays a list of timer containers-
EditableTimer: Displays either a timer or a timer's edit formTimer: Displays a given timerTimerForm: Displays a given timer's edit form
-
-
ToggleableTimerForm: Displays a form to create a new timerTimerForm(not displayed): Displays a new timer's create form
-
Represented as a hierarchical tree:
In our previous app,
ProductListhandled not only rendering components, but also the responsibility of handling up-votes and talking to the store. While this worked for that app, you can imagine that as a codebase expands, there may come a day where we'd want to freeProductListof this responsibility.For example, imagine if we added a "sort by votes" feature to
ProductList. What if we wanted some pages to be sortable (category pages) but other pages to be static (top 10)? We'd want to "hoist" sort responsibility up to a parent component and makeProductListthe straightforward list renderer that it should be.This new parent component could then include the sorting-widget component and then pass down the ordered products to the
ProductListcomponent.
The steps for building React apps from scratch
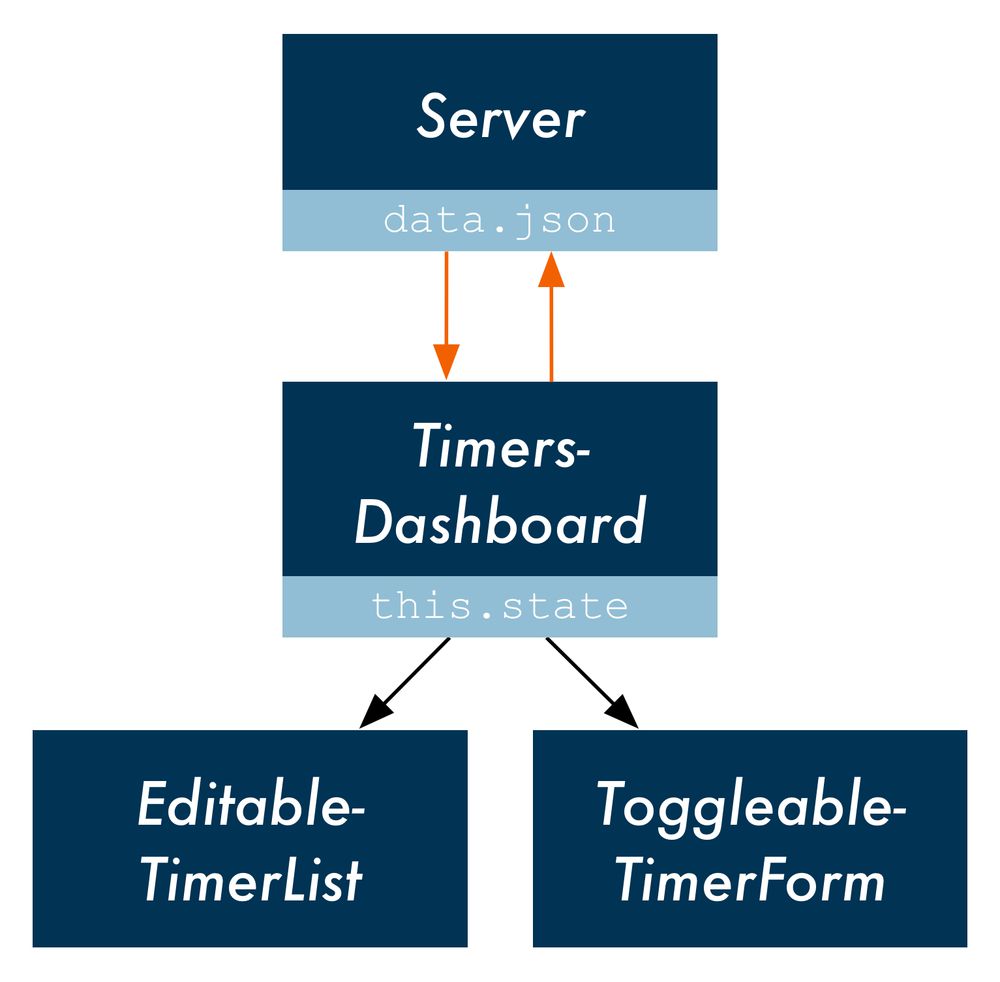
Now that we have a good understanding of the composition of our components, we're ready to build a static version of our app. Ultimately, our top-level component will communicate with a server. The server will be the initial source of state, and React will render itself according to the data the server provides. Our app will also send updates to the server, like when a timer is started:
However, it will simplify things for us if we start off with static components, as we did in the last chapter. Our React components will do little more than render HTML. Clicking on buttons won't yield any behavior as we will not have wired up any interactivity. This will enable us to lay the framework for the app, getting a clear idea of how the component tree is organized.
Next, we can determine what the state should be for the app and in which component it should live. We'll start off by just hard-coding the state into the components instead of loading it from the server.
At that point, we'll have the data flow from parent to child in place. Then we can add inverse data flow, propagating events from child to parent.
Finally, we'll modify the top-level component to have it communicate with the server.
In fact, this follows from a handy framework for developing a React app from scratch:
- Break the app into components
- Build a static version of the app
- Determine what should be stateful
- Determine in which component each piece of state should live
- Hard-code initial states
- Add inverse data flow
- Add server communication
We followed this pattern in the last project:
1. Break the app into components
We looked at the desired UI and determined we wanted ProductList and Product components.
2. Build a static version of the app
Our components started off without using state. Instead, we had ProductList pass down static props to Product.
3. Determine what should be stateful
In order for our application to become interactive, we had to be able to modify the vote property on each product. Each product had to be mutable and therefore stateful.
This page is a preview of Fullstack React: The Complete Book on ReactJS and Friends.
Get the rest of this chapter plus hundreds of pages of React instruction, 5 sample projects, a screencast, and more.
